Connecting with your clients can be challenging. Fortunately, the internet provides a multitude of avenues to make contact with your communities, even remotely.
While videoconferencing and regular pre-recorded video are great ways to offer services and market your brand, one oft-ignored but highly engaging option is live video streaming.
While a few years ago a more specialized form of online interaction, live streaming now is integrated into the most popular engagement platforms, including Facebook and YouTube. Like normal videos, they’re great at connecting with as many people as possible, but have the added benefit of letting viewers ask questions and provide feedback in real time. You can use a live stream to:
- Hold a public Q&A or roundtable on one of your business’s areas of expertise
- Present a workout, tutorial, or lesson and immediately respond to audience feedback
- Share an event, like a concert or church service, so it can be attended remotely
Before we start, though, a quick note: while initially it may seem that live streaming and video conferences are fairly similar, their applications are actually much different. Unlike a video conference, live streams are typically public, and consequently limit audience interaction to a chat or other ancillary elements. If you’re looking to engage in-depth with a few specific people, then a private video conference will be a better choice.
Live Streaming for Classes, Workshops, and Q&As
If you intend to stream just yourself or a small group of people, your laptop with its built-in webcam and microphone will probably be enough, or a cell phone on a stand. Isolate yourself in a quiet room, get everyone close to the camera, and make sure to provide an ample, even amount of light. Wesley Dean has put together a great resource on how you can drastically improve your video with a few small changes.
It’s a good idea to let your audience know you plan to livestream beforehand, and set a specific day and time for it, like any other event. It’s also a good idea to do a test run before the real thing, to make sure you don’t have any equipment hiccups. Most platforms will allow you to specify the visibility of your stream, so you don’t clog up your timeline.
Shortly before you start, open up the platform that you’ll be using and create your stream.
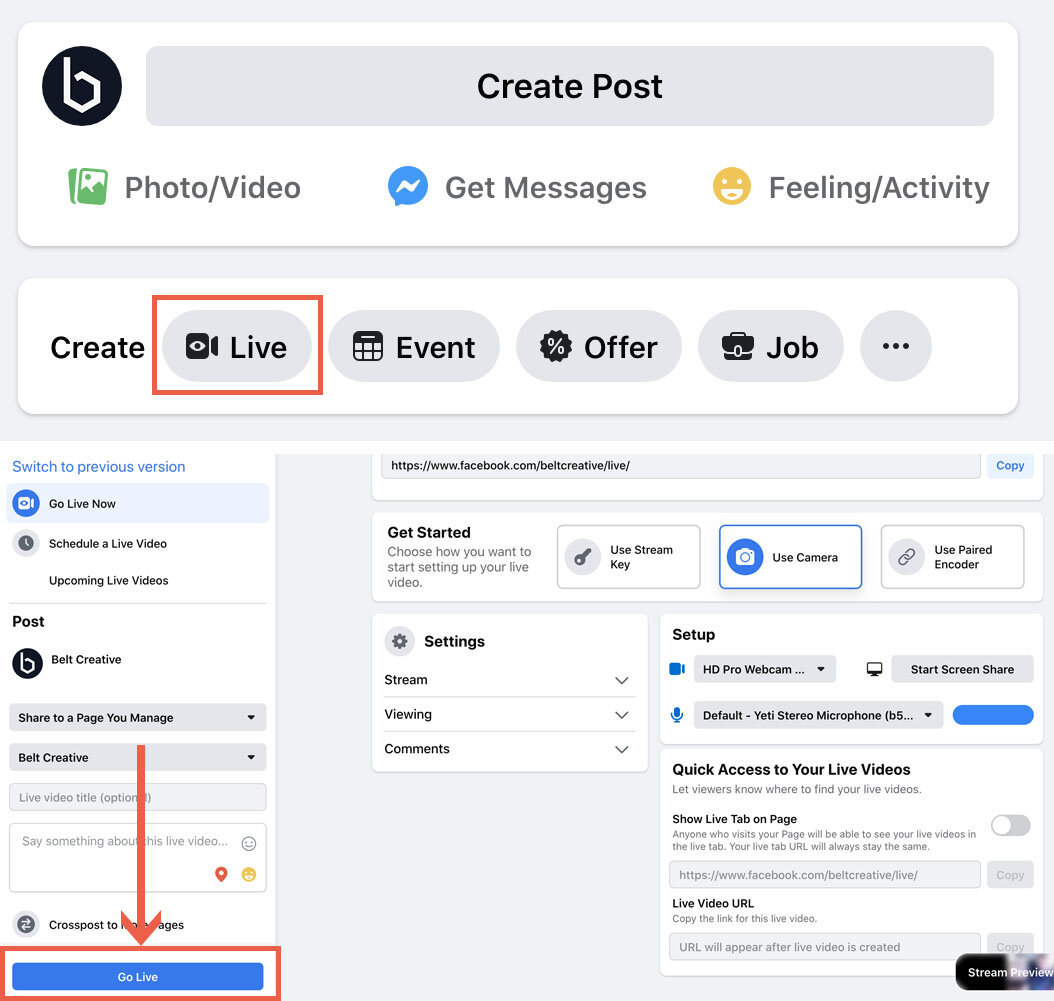
On Facebook, you can do this by navigating to your profile and creating a new “Live Video” post. This opens the Live Producer, where you’ll be able to preview what your camera looks like before you begin. Once you’re ready, click “Go Live,” and your stream will become publicly available to your followers.

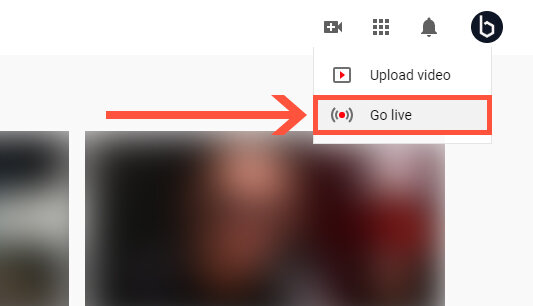
On YouTube, you can click the “Add Video” icon in the upper bar and select “Go Live.”

One of the benefits of live streaming, as opposed to a prerecorded video, is your ability to interact with your viewers in real time. While you’re on the air, they’ll be able to leave questions or comments in a stream chat, so keep an eye on that and be sure to respond to any interesting interjections.
After the stream is over, both Facebook and YouTube will post a recording on your profile, so that anyone who missed the stream can catch up later.
How to Live Stream a Video Call (or Several Inputs at Once)
Note: Have Zoom? While writing this blog post, we learned that you can also live stream meetings and webinars through that, if you have the proper subscription. You can learn more here (Facebook) or here (YouTube). The process is generally similar to the below, only you use Zoom instead of OBS.
If you want to share your device’s screen or a certain app, like a video call with some of your colleagues, you’ll need a streaming software to help you out. Fortunately, you can get OBS, a pretty good one, for free at https://obsproject.com/.
SHARING YOUR SCREEN
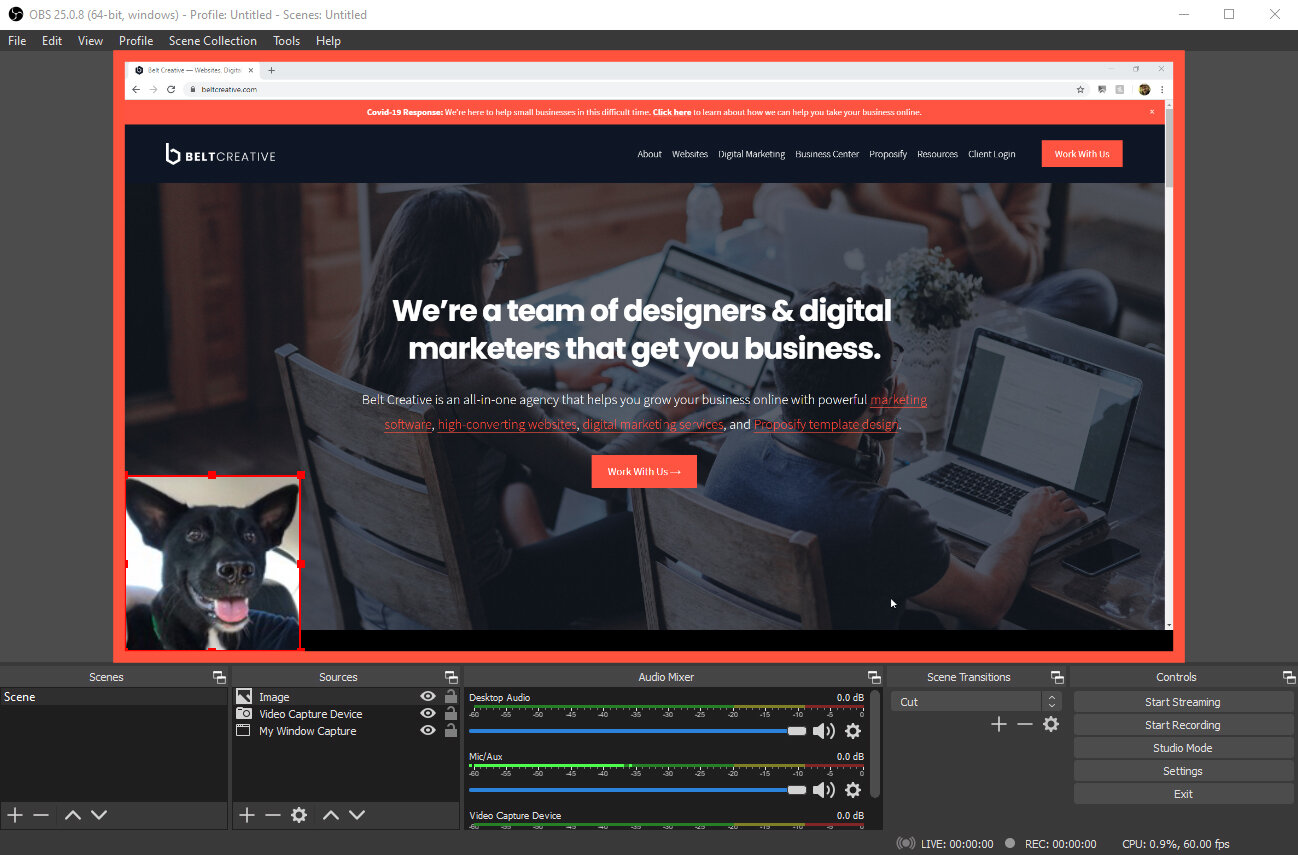
Streaming software is like Photoshop for live video. You can use it to compile, arrange, and mix multiple video and audio sources and output them as a single broadcast. In this case, we’ll be using it to capture your screen and webcam together.
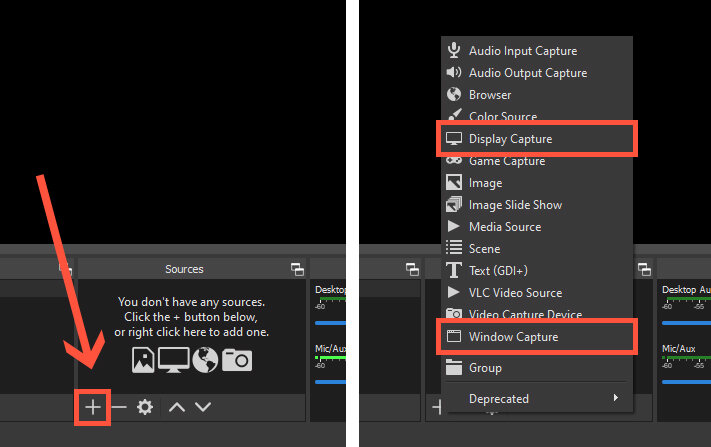
To add your screen as a source, click on the “+” under “Sources” and select “Display Capture.” If you would like to share only a certain window, instead, you can choose “Window Capture.”

Once you give your display or window a name, it will be added to the list of sources. However, we still need to tell OBS where to draw that data from. Double-click on the source’s name to open its settings, and select your display or window from the dropdown.

If you want to overlay your webcam, too, simply add a new “Video Input Device” source and select your webcam in its settings. Then, simply click and drag to rearrange and resize your sources in the canvas.

STARTING THE STREAM
In order to tell OBS where to send your video once you go live, we’ll need to give it your “stream key.” This will be prominently displayed on your streaming platform once you start creating your post.

Simply go to File>Settings>Streaming, select your platform from the dropdown, and paste in your stream key. Then, once you click “Start Streaming” in the main interface, your video will be piped to your streaming platform, and you’re ready to go live!

Live Streaming for Concerts, Events, and Churches
If your needs are more complicated, like a concert or church service, you may need to utilize additional equipment, like dedicated cameras, a sound system, and additional software. It can be a puzzle to figure out, but, fortunately, Jake Gosselin from Churchfront has a detailed overview of what you’ll need and how it hooks together.
Once you get the hang of it, live streaming can be a lot of fun, like being on broadcast television or putting on a play. This is just a primer on the multitudinous possibilities of live streams, so we encourage you to dig in and get creative. Need help getting the word out about your business? Drop us a line.


